
If you are a proud owner of a 2010 Dodge Avenger, knowing the location and function of each fuse is essential. The fuse box diagram is a helpful resource that allows you to identify which fuse controls the different electrical components in your vehicle. Whether you need to replace a blown fuse or troubleshoot an electrical issue, having a complete guide to the 2010 Dodge Avenger fuse box diagram will save you time and frustration.
Inside the fuse box, you will find various fuses that protect the electrical circuits in your Dodge Avenger. These fuses are designed to blow and break the circuit in the event of an electrical overload or short circuit, preventing damage to your vehicle’s electrical system. The fuse box diagram provides you with a visual representation of the fuse box and its contents, making it easier to locate and replace a specific fuse if needed.
Some of the key electrical components that are controlled by fuses in the 2010 Dodge Avenger include the power windows, door locks, interior lights, radio, and air conditioning system. By referring to the fuse box diagram, you can quickly identify the fuse responsible for a specific component, allowing for efficient troubleshooting and repairs. Additionally, the diagram also indicates the amp rating of each fuse, ensuring that you select the correct replacement.
In conclusion, the 2010 Dodge Avenger fuse box diagram is an essential tool for any owner of this vehicle. It provides valuable information on the location and function of each fuse, allowing for efficient troubleshooting and repairs. By familiarizing yourself with the fuse box diagram, you can confidently address any electrical issues that may arise with your Dodge Avenger. Ensure that you always have a copy of the diagram readily available, either in your vehicle’s owner’s manual or by downloading and printing a digital version.
Fuse Box Location
The fuse box on a 2010 Dodge Avenger is located in the engine compartment. To access it, you will need to open the hood and locate the fuse box cover. The fuse box cover is usually labeled with the specific fuse and relay information.
Once you locate the fuse box cover, you can remove it by pulling on the tab or by using a small screwdriver to pry it open. Inside the fuse box, you will find a diagram that indicates the function of each fuse and relay.
It is important to note that the fuse box layout may vary depending on the specific model and trim level of your Dodge Avenger. Therefore, refer to your vehicle’s owner’s manual for the most accurate fuse box diagram and information.
If you are having trouble locating the fuse box, it is always recommended to consult a professional or refer to the owner’s manual for assistance. Properly identifying and replacing the correct fuse or relay is crucial to ensure the safe operation of your vehicle’s electrical systems.
Understanding the Fuse Box Diagram
The fuse box diagram for a 2010 Dodge Avenger provides a visual representation of the electrical layout and function of each fuse in the vehicle. By referring to the diagram, you can easily identify the fuses responsible for various electrical systems and components in your Avenger.
The fuse box is located under the hood on the driver’s side, near the battery. It houses multiple fuses and relays that protect different circuits in the vehicle from electrical overload.
Each fuse in the fuse box diagram is represented by a number and a corresponding color. The number indicates the amp rating of the fuse, which determines how much current it can safely carry. The color of the fuse corresponds to its function, making it easier to identify the fuse associated with a specific electrical system or component.
The fuse box diagram also includes a legend or key that provides information about the different symbols used in the diagram. This key helps you understand the purpose of each fuse and its location in the fuse box.
When a particular electrical system or component in your Dodge Avenger stops working, consulting the fuse box diagram can be helpful in determining whether a blown fuse is the cause. By locating the appropriate fuse in the diagram and checking its amp rating, you can quickly identify and replace a faulty fuse.
It is important to note that fuses should always be replaced with a fuse of the same amp rating to ensure proper electrical protection. Using a higher amp fuse can result in damage to the electrical system or even a potential fire hazard.
Understanding the fuse box diagram for your 2010 Dodge Avenger can be a valuable resource when troubleshooting electrical issues or making modifications to your vehicle’s electrical system. By familiarizing yourself with the diagram and its components, you can confidently handle electrical repairs and upgrades in your Avenger.
Fuse Box Diagram for Interior Fuse Box
The interior fuse box of a 2010 Dodge Avenger is located on the driver’s side of the instrument panel. To access the fuse box, you will need to open the driver’s door and remove the cover panel on the side of the dashboard. Inside the cover panel, you will find a diagram that indicates the function and location of each fuse.
The interior fuse box contains various fuses that control different components of the vehicle’s electrical system. These fuses include those for the power windows, power locks, interior lights, radio, and more. Each fuse is labeled with a number and a corresponding symbol, making it easy to identify and replace if necessary.
Here is a breakdown of the fuses in the interior fuse box:
1. Fuse #1 – 10A – Instrument Cluster/Powertrain Control Module
2. Fuse #2 – 15A – Occupant Restraint Controller/Ignition Switch
3. Fuse #3 – 10A – Battery Run Down Protection/Anti-Lock Brake System/Starter Solenoid
4. Fuse #4 – 10A – Ignition Switch/Sentry Key Immobilizer Module/Starter Motor Relay
5. Fuse #5 – 15A – Ignition Switch/Heated Seats/Electronic Stability Control Module
6. Fuse #6 – 10A – Ignition Switch/Blower Motor Relay/Electro Hydraulic Power Steering Module
7. Fuse #7 – 30A – Circuit Breaker – Power Windows
8. Fuse #8 – 10A – Ignition Switch/Door Modules/Sunroof Motor
9. Fuse #9 – 10A – Ignition Switch/Instrument Panel Amplifier/Sunroof Switch
10. Fuse #10 – 10A – Ignition Switch/Key-In/Ignition/Start Switch
11. Fuse #11 – 10A – Ignition Switch/Rear Window Defroster Relay/Starter Motor Relay
12. Fuse #12 – 10A – Ignition Switch/Climate Control System/Instrument Cluster
13. Fuse #13 – 10A – Ignition Switch/Instrument Panel Amplifier/Power Outlet
Caution:
It is important to note that the fuse box diagram may vary depending on the specific model and trim level of your Dodge Avenger. Therefore, it is recommended to refer to your vehicle’s owner’s manual or the fuse box diagram located on the underside of the cover panel for the most accurate and up-to-date information on the fuses in your specific vehicle.
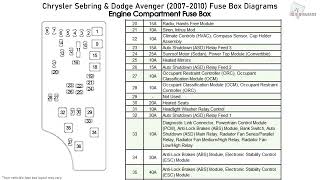
Fuse Box Diagram for Under the Hood Fuse Box
The under the hood fuse box in the 2010 Dodge Avenger is located on the driver’s side of the engine compartment. It contains several fuses that control various electrical components of the vehicle. Here is a diagram of the fuses and their corresponding components:
1. Fuse 10A – Air Conditioning Compressor Clutch
This fuse is responsible for controlling the clutch of the air conditioning compressor. If the air conditioning system is not working properly, check this fuse to see if it has blown.
2. Fuse 15A – Radiator Fan
This fuse controls the radiator fan, which is responsible for cooling the engine. If the engine is overheating, check this fuse to make sure it is intact.
3. Fuse 25A – Powertrain Control Module
This fuse supplies power to the powertrain control module, which controls the engine and transmission. If there are any issues with the engine or transmission, check this fuse to see if it is blown.
4. Fuse 40A – Starter
This fuse provides power to the starter motor, which is responsible for starting the engine. If the engine is not cranking, check this fuse to see if it is faulty.
5. Fuse 10A – Fuel Pump
This fuse powers the fuel pump, which is responsible for supplying fuel to the engine. If the engine is not getting fuel, check this fuse to see if it needs to be replaced.
Note: The above diagram is a general representation of the fuse box and may not be an exact representation for the 2010 Dodge Avenger. It is always recommended to consult the owner’s manual or a professional technician for the accurate fuse box diagram.
Fuse Box Diagram for Trunk Fuse Box
The trunk fuse box of the 2010 Dodge Avenger is located in the rear compartment of the vehicle. It contains various fuses that protect different electrical components in the trunk area. Here is a breakdown of the fuses and their corresponding functions:
- Fuse 1: Rear Power Outlet
- Fuse 2: Trunk Lamp
- Fuse 3: Occupant Classification Module
- Fuse 4: Anti-Lock Brake System (ABS)
- Fuse 5: Trailer Tow Ignition Lock Feed
- Fuse 6: Ignition Off Draw (IOD)
- Fuse 7: Central Power Module (CPM)
- Fuse 8: Right High-Intensity Discharge (HID) Lamp
- Fuse 9: Left High-Intensity Discharge (HID) Lamp
- Fuse 10: Power Inverter
- Fuse 11: Battery Feed – Ignition Switch
If any of the above fuses are blown, it is recommended to replace them with fuses of the same amperage rating. Blown fuses can cause electrical issues or malfunctions in the trunk area, so it is important to check and replace them if necessary.
Always consult the vehicle’s owner manual or the fuse box cover for the exact fuse locations and amperage ratings. Proper care and maintenance of the fuses will help ensure the proper functioning of the electrical system in your 2010 Dodge Avenger.
Commonly Blown Fuses

The 2010 Dodge Avenger is equipped with a fuse box that houses a collection of fuses to protect various electrical components in the vehicle. Over time, these fuses can blow due to a variety of reasons, such as an electrical short or a faulty component.
Blown Fuse Symptoms
When a fuse blows, it can cause certain electrical systems or components to stop working. Some common symptoms of a blown fuse in the 2010 Dodge Avenger include:
- Dashboard lights not functioning
- Power windows not working
- Radio or audio system not turning on
- Interior lights not illuminating
Commonly Blown Fuses
Here are some frequently blown fuses in the 2010 Dodge Avenger. It’s important to note that the location and amp rating of each fuse may vary, so consult the vehicle’s owner’s manual for the precise information.
| Fuse | Component |
|---|---|
| Fuse 12 | Horn |
| Fuse 18 | Headlamp high beam |
| Fuse 27 | Headlamp low beam |
| Fuse 30 | Windshield wipers |
| Fuse 32 | Power windows |
| Fuse 42 | Radio |
| Fuse 49 | Air conditioning compressor |
If you experience any of the symptoms mentioned earlier, it may be worth checking these fuses to see if they are blown. Remember to always replace blown fuses with the correct amp rating to prevent further electrical issues.
Replacing Blown Fuses
If you are experiencing a problem with a specific electrical component in your 2010 Dodge Avenger, such as your headlights not working or your radio not powering on, it is possible that a fuse may have blown. Fuses are small devices that protect electrical circuits from excessive electrical currents, and when they blow, they need to be replaced.
To replace a blown fuse in your 2010 Dodge Avenger, you will first need to locate the fuse box. The fuse box is usually located under the dashboard on the driver’s side or in the engine compartment. Once you have located the fuse box, you can refer to the fuse box diagram to identify the fuse that is associated with the malfunctioning component.
The fuse box diagram is a map that shows the locations and functions of each fuse in the fuse box. The diagram will typically be located on the inside of the fuse box cover or in the owner’s manual. It is important to consult the diagram to ensure that you are replacing the correct fuse.
To remove a blown fuse, you can use a fuse puller tool that is usually included in the fuse box or a pair of needle-nose pliers. Simply grasp the blown fuse and gently pull it out of its slot. Be careful not to twist or break the fuse.
Once the blown fuse has been removed, you can replace it with a new fuse of the same amperage rating. It is crucial to use a fuse with the correct amperage rating to prevent electrical damage to the circuit. If you are unsure of the correct amperage rating, you can consult your vehicle’s owner’s manual or a fuse box diagram.
After inserting the new fuse, it is important to make sure it is securely in place. Gently push the fuse into the slot until it is fully seated. Once the new fuse is in place, you can test the malfunctioning component to see if it is now functioning properly. If the problem persists, there may be a deeper electrical issue that requires further troubleshooting or professional assistance.
In conclusion, replacing blown fuses in your 2010 Dodge Avenger is a straightforward process that can help resolve electrical issues with specific components. By consulting the fuse box diagram, selecting the correct replacement fuse, and ensuring it is securely inserted, you can quickly and effectively restore functionality to your electrical systems.
Tips for Fuse Box Maintenance
Proper maintenance of your vehicle’s fuse box is essential to ensure that your vehicle’s electrical systems function properly. Here are some tips to help you maintain your fuse box:
- Regularly inspect the fuse box for any signs of damage or corrosion. If you notice any problems, such as melted fuses or frayed wires, it is important to address them as soon as possible.
- Keep the fuse box clean and free from debris. Dust and dirt can cause problems with the electrical connections, so it’s important to clean the fuse box regularly.
- Make sure to use the correct size and type of fuses for your vehicle. Using the wrong fuses can cause electrical problems and potentially damage your vehicle’s electrical system.
- Check the fuse box regularly for any blown fuses. If a fuse is blown, it will need to be replaced with a new one of the same amperage rating.
- If you are unsure of how to replace a fuse or perform any maintenance on the fuse box, it is recommended to consult your vehicle’s owner’s manual or seek assistance from a professional mechanic.
- During any electrical repairs or modifications, always disconnect the battery before working on the fuse box. This will prevent any accidental shorts or electrical shocks.
By following these tips, you can ensure that your vehicle’s fuse box remains in good condition and that your vehicle’s electrical systems continue to function properly.
Q&A
What is a fuse box diagram?
A fuse box diagram is a graphical representation of the fuses and relays located in the fuse box of a vehicle. It shows what each fuse controls and allows the vehicle owner to easily locate and replace blown fuses.
Where can I find the fuse box in a 2010 Dodge Avenger?
The fuse box in a 2010 Dodge Avenger is located in the engine compartment. It is mounted near the battery and has a black plastic cover. Simply remove the cover to access the fuses and relays.
How many fuses are there in the 2010 Dodge Avenger?
The 2010 Dodge Avenger has a total of 67 fuses. These fuses are located in two different fuse boxes, one in the engine compartment and one in the interior of the vehicle.
What does each fuse in the 2010 Dodge Avenger control?
Each fuse in the 2010 Dodge Avenger is labeled with a specific function. For example, the fuse for the headlights is labeled “HEADLAMP LWR” and the fuse for the power windows is labeled “PWR WINDOW”. The fuse box diagram provides a complete list of each fuse and its corresponding function.
How do I replace a blown fuse in the 2010 Dodge Avenger?
To replace a blown fuse in the 2010 Dodge Avenger, first locate the fuse that is labeled for the specific function that is not working. Then, using a fuse puller or a pair of needle-nose pliers, carefully remove the blown fuse and replace it with a new fuse of the same amperage. The fuse box diagram will indicate the amperage for each fuse.
What is a fuse box diagram?
A fuse box diagram is a visual representation of the layout and assignment of the fuses in a particular vehicle. It shows which fuse is connected to each electrical circuit and what the fuse rating is.
Where can I find the fuse box in a 2010 Dodge Avenger?
The fuse box in a 2010 Dodge Avenger is located in the engine compartment on the driver’s side. It is a black box with a removable cover. Simply remove the cover to access the fuses.